
Mosaic Ideas for Beginners: 15 Moroccan-Inspired Projects
A handful of blue and white tiles can become a coaster, a picture frame, or a little piece of wall art. You do not need a large workspace or an elaborate pattern to begin. The most useful mosaic ideas for beginners start with a small surface, a few colors, and shapes that are easy to arrange.
Moroccan zellige offers beautiful inspiration for these first projects. Its geometric compositions encourage you to look closely at repetition, borders, and the relationship between one colored piece and the next. This guide translates that inspiration into 15 approachable craft projects, from a simple checkerboard coaster to a coordinated set of mini panels.
You will find suggested sizes, practical design instructions, supply advice, and a step-by-step method for getting started. Most projects use pre-cut tiles. These are zellige-inspired home crafts; learning traditional tile cutting and assembly is a separate experience best explored with an artisan.
The easiest mosaic project to start with
A two-color checkerboard coaster is an excellent first mosaic project. Equal-size square tiles make the layout easy to plan, and a small base lets you practice spacing, adhesive application, and finishing without managing a complicated design.
For a purely decorative option, choose a striped mini panel. It gives you the same practice without needing to design a surface for wet glasses. Once you feel comfortable, try a central diamond surrounded by a plain background.
Keep your first project approximately 10–15 cm wide. Choose tiles of consistent thickness and lay out the entire design before opening the adhesive. If you discover that the pattern does not fit, change the base or tile arrangement rather than forcing tiny fragments into the edges.
Finding inspiration in Moroccan zellige
Traditional zellige mosaic patterns are assembled from shaped glazed tile pieces. Stars, diamonds, and repeating geometric arrangements are useful starting points for studying how individual shapes form a larger composition. For examples of handmade geometric layouts, explore Moroccan zellige mosaics from Tiles of Ezra.
For a beginner craft, borrow one design feature at a time. You might choose a blue-and-ivory palette, repeat a diamond across a border, or build a symmetrical arrangement around a central shape. A simple pattern with consistent spacing often looks more finished than a complex one with crowded edges.
The projects below use a direct method: you place tiles face up onto a base. This differs from the face-down assembly described in our zellige workshop in Fes. The distinction matters because making a craft inspired by Moroccan tilework is different from reproducing the full traditional process.
Supplies for small mosaic projects
Choose your base, tiles, and adhesive together. Compatibility matters more than buying a long list of tools. A decorative indoor plaque and a coaster exposed to condensation do not necessarily need the same materials.
For most of these beginner mosaic projects, prepare:
- Pre-cut ceramic or mosaic tiles with smooth edges and similar thickness.
- A rigid base recommended for mosaic work and the intended setting.
- Adhesive suitable for the tile material, base, and expected moisture exposure.
- Grout appropriate for the joint width, if your chosen method requires it.
- A pencil, ruler, and paper for planning the pattern.
- A small adhesive spreader, sponge, and clean cloth.
- Protective equipment specified on the adhesive and grout packaging.
- Backing pads or hanging hardware suitable for the finished object.
Start with flat surfaces and pre-cut pieces. Tile cutting introduces sharp fragments and requires suitable tools and instruction; you do not need it to complete a satisfying first project. For activities with young children, paper mosaic shapes are an easier alternative to ceramic pieces and grout.
A mosaic-specific kit can simplify material selection, but check what is included. A pack of tiles alone does not tell you which adhesive or base will suit your project. Keep the packaging until your work is finished so you can follow curing and cleaning instructions.
15 mosaic ideas for beginners
These sizes are suggestions, not fixed plans. Dry-fit your tiles and adjust the dimensions before buying or preparing the base. Finish each project using the general method later in this article, with drying and curing times taken from your chosen products.
1. Cobalt and white checkerboard coaster
Suggested size: approximately 10 × 10 cm. Palette: cobalt and ivory. Shapes: equal-size squares.
Alternate blue and white tiles in straight rows. Start at one corner during the dry layout, then check that the same spacing can continue across the whole base. Photograph the arrangement before lifting pieces to apply adhesive.
A grid of five tiles across is easy to visualize, but the finished width must include four joints as well as the tiles. Five 18 mm tiles with four 2 mm joints occupy 98 mm before any edge margin. Measuring this first prevents an awkward final row.
Use a moisture-compatible base and fixing system if the coaster will hold drinks. Check for a level surface and add suitable backing pads after curing. Treat the finished coaster as a drinks accessory, not a hot-pan trivet.
2. Green and cream striped mini panel
Suggested size: approximately 10 × 15 cm. Palette: green and cream. Shapes: squares or rectangles.
Arrange alternating vertical stripes across a small decorative panel. Keep each stripe the same width, or make one green stripe wider to create an intentional focal point. Lay out the outside edges before attaching the middle rows.
This is one of the easiest small mosaic projects because you repeat a single decision. A ruler beside the first row helps establish a straight starting line; the remaining stripes can follow it.
Display the finished panel on a small stand. If you want to hang it, select a base and fixing system designed to carry the weight of the tiles and grout.
3. Diamond pattern mosaic plaque
Suggested size: approximately 12 × 12 cm. Palette: turquoise, navy, and ivory. Shapes: pre-cut diamonds or matching triangles.
Mark the center of your base and arrange one colored diamond there. Surround it with a quiet ivory field, then test a single navy border. The contrast should make the center easy to see from a distance.
Build the dry layout outward in opposite pairs: left and right, then above and below. This makes it easier to notice when the central motif is drifting off balance.
Use a tile set with compatible background shapes. Do not assume that any diamond will fit neatly among square tiles without gaps or cutting. A simple supplied template can remove that uncertainty.
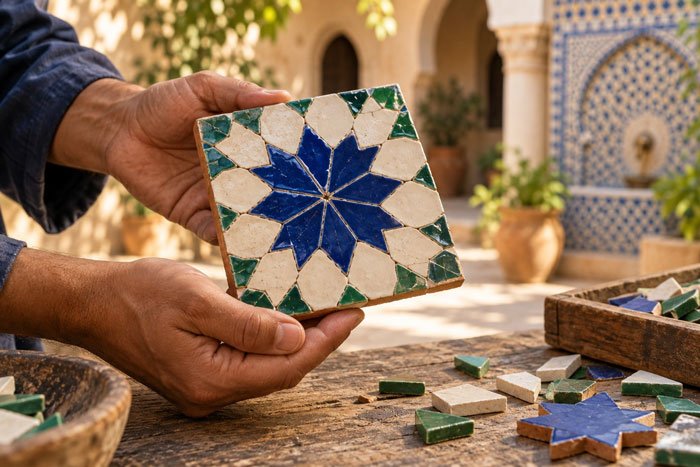
4. Moroccan star mini wall art
Suggested size: approximately 15 × 15 cm. Palette: cobalt and white. Shapes: a compatible pre-cut star-pattern set.
Choose a simplified eight-point star template and arrange the supplied pieces over a paper copy first. Check that the surrounding shapes fit before transferring the design to the base.
Keep the star one color and the background another. This lets the geometry carry the design without requiring a complicated color plan. Mark the base center and work outward, checking opposite points for symmetry.
This is a next-step beginner project rather than the easiest starting point. Choose pre-cut shapes designed to form the pattern together; improvising an intricate star from unrelated tile pieces can turn a small project into a cutting exercise.
5. Zellige inspired picture frame
Suggested size: a small frame with a wide, flat border. Palette: blue, white, and one green accent. Shapes: small squares.
Remove the photograph, glazing, and backing where the frame design allows. Dry-fit a row of tiles around the outside edge and decide how the pattern will turn each corner. Repeat the same corner arrangement on all four sides.
Fill the remaining border with a simple sequence, such as two white tiles followed by one blue. Add the green accent at each corner if you want a little more color.
Keep tiles clear of the opening and any moving parts. Before decorating, check whether the frame and its stand or hanging hardware can support the added weight.
6. Small mosaic mirror border
Suggested size: a small mirror mounted within a suitable rigid backing. Palette: ivory and turquoise. Shapes: small squares or rectangles.
Plan a narrow border around the mirror, using a repeated color sequence to keep the surface calm. Protect the mirror while you work and follow the mirror manufacturer’s instructions for any adhesive that contacts its backing.
Arrange the corners first, then fill the straight sections. A single consistent row is enough to create a finished design; several busy rows can compete with a small mirror.
Use a prepared mosaic mirror blank if possible. It reduces the amount of structural assembly needed. Plan suitable hanging hardware before adding tiles, accounting for the complete finished weight.
7. Blue and white decorative tray
Suggested size: a small tray with a flat recessed interior. Palette: cobalt and ivory. Shapes: uniform squares.
Begin with a plain ivory center framed by one blue row. Dry-fit the design inside the recess and check that the tiles, adhesive, and grout will not rise above the tray rim.
Attach tiles in small sections while keeping the center level. A restrained border can look especially effective when the tray holds a vase or a few decorative objects.
Use this as a decorative tray rather than a direct food-contact surface. If you plan to place drinks on it, choose the entire material system for that exposure. Grout or a surface sealer alone does not make an unsuitable tray waterproof.
8. Mosaic jewelry tray
Suggested size: approximately 10–12 cm across, with a flat interior. Palette: cream with a small green diamond. Shapes: smooth squares and compatible accent pieces.
Choose a shallow trinket tray that will remain easy to use after decoration. Place a small motif in the center, then fill around it with one background color. Keep the outer rim simple.
Consistent tile thickness is particularly useful here. Raised corners can catch delicate chains, so check the surface carefully before the adhesive sets and again after finishing.
Do not extend sharp tile edges over the rim. A neat interior mosaic gives the tray enough character without covering every surface. Use it for rings and other small items once all products have fully cured.
9. Moroccan arch mosaic plaque
Suggested size: approximately 12 × 18 cm. Palette: navy and ivory. Shapes: small pre-cut tiles.
Sketch a broad arch on paper, then transfer its outline to a rectangular base. Fill the arch shape with navy tiles and the surrounding area with ivory.
Use small pieces to suggest the curved top through short steps. You do not need a perfectly smooth curve for the doorway to read clearly. Test this part of the layout first, because it is the section most likely to need adjustment.
Keep the doorway unadorned or add one contrasting tile as a handle. A simple architectural silhouette makes a stronger first project than a miniature scene packed with details.
10. Terracotta and ivory zigzag panel
Suggested size: approximately 10 × 15 cm. Palette: terracotta and ivory. Shapes: matching pre-cut triangles.
Arrange triangles into one complete zigzag band on your work surface. Once you understand how the shapes repeat, add a second band and check that the two rows meet neatly.
Transfer the pattern onto a base marked with light horizontal guide lines. Work across one band at a time rather than filling random sections. The repeated angles will look more consistent.
Leave enough room at the edges for a planned finish. If the pattern ends awkwardly, adjust the number of repeats during the dry layout. A smaller complete pattern is easier to finish than a larger one that needs many cut fragments.
Fes Pottery Art
Make a Moroccan mosaic with us in Fes
If arranging these patterns makes you curious about traditional craftsmanship, join our zellige workshop in Fes. At Fes Pottery Art, the experience introduces you to geometric tilework through artisan guidance, demonstrations, and hands-on assembly.
You can explore how shaped pieces come together and create your own mosaic panel. Visit the workshop page for the current program and inclusions, then tell us your preferred date and how many people will join you.
11. Mosaic initial plaque
Suggested size: approximately 12 × 12 cm. Palette: dark blue and cream. Shapes: small squares.
Draw a simple block initial on squared paper, treating each square as one tile. Transfer the layout to your base and form the letter in dark blue against a cream background.
Step back before gluing. If the initial is difficult to read, widen its main strokes or simplify the shape. Letters with curves can be represented by stepped edges rather than finely cut pieces.
Finish with a narrow contrasting border if space allows. The combination of a personal initial and a geometric frame makes this a useful handmade gift without demanding an elaborate mosaic pattern.
12. Mosaic keepsake box lid
Suggested size: a rigid box with a flat lid approximately 10–15 cm wide. Palette: green, ivory, and blue. Shapes: small squares or a central diamond set.
Decorate only the top of the lid. Place a diamond in the center or repeat a simple border around the edge, leaving space beside the hinges and the opening seam.
Test how the box opens with the loose tile arrangement in place. A lid that clears the back edge when bare may catch once tiles are added. Keep the design inside any area that moves close to another surface.
Choose a sturdy box and a compatible adhesive. Lightweight flexible cardboard is not a good substitute for a rigid mosaic base, especially when the lid must carry extra weight.
13. Geometric mosaic magnet set
Suggested size: three small bases approximately 4–5 cm wide. Palette: cobalt, turquoise, and white. Shapes: small uniform squares.
Give each magnet a different arrangement: one checkerboard, one stripe pattern, and one central square. Keep the same colors across all three so they feel like a collection.
Use lightweight bases and avoid unnecessary layers of heavy material. After finishing and curing, attach magnets using a fixing method compatible with both surfaces and rated for the load.
Test each piece close to a protected surface before using it on a refrigerator. These are decorative objects, not children’s toys; small tiles and magnets must stay out of reach of young children.
14. Mosaic plant pot sleeve
Suggested size: a small straight-sided outer plant holder. Palette: cream and green. Shapes: small squares.
Add one horizontal mosaic band around the outside instead of covering the entire holder. Measure the circumference and dry-fit the pattern as a strip to see how its ends will meet.
Use small tiles that sit comfortably against the curve. Large flat pieces may leave corners standing proud. Work in short sections and check the band from several angles as you go.
Keep the plant in a separate inner pot and remove it for watering. Select the base, adhesive, and grout for expected moisture exposure. This is a next-step project because curved surfaces require more adjustment than a flat plaque.
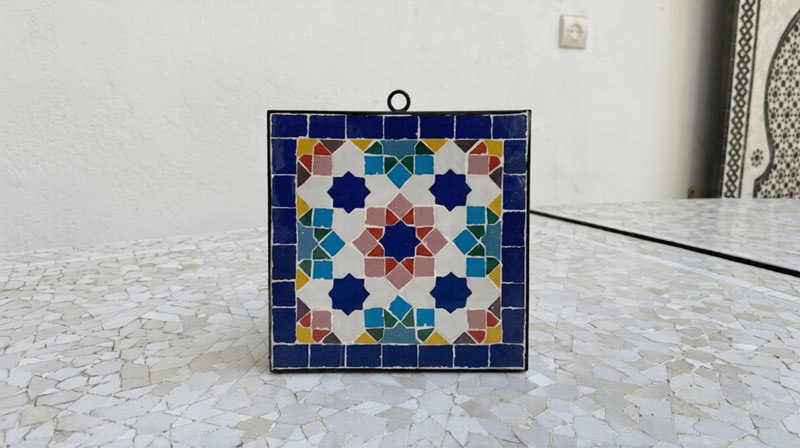
15. Three piece Moroccan mosaic wall set
Suggested size: three matching panels, each approximately 10 × 10 cm. Palette: blue, ivory, and green. Shapes: chosen to suit each motif.
Make a checkerboard panel, a central diamond panel, and a simplified star panel. Repeat the same border color and background across all three to connect the designs.
Complete the checkerboard first. Use it as a reference for spacing, grout color, and edge treatment when making the other two pieces. This keeps the collection consistent even though the patterns differ.
Display the panels on a shelf or hang them using suitable hardware. The project can grow gradually: finish one piece, learn from it, and add the others when you are ready.
How to make a simple mosaic step by step
Use the checkerboard coaster or striped mini panel for your first attempt. Set aside time for planning and tile placement, then allow separate periods for adhesive curing, grouting, and final curing. A small design is not necessarily ready to use on the day you assemble it.
Choose and prepare the base
Select a rigid base suitable for the intended use. Check whether the adhesive manufacturer requires cleaning, priming, or another preparation step. Do not add a generic sealer underneath the adhesive unless the products are compatible.
Place the base on a protected work surface. Have your supplies ready so you can work within the adhesive’s stated working time.
Draw the pattern and dry fit the tiles
Mark the center or a starting line, then arrange every tile without glue. Include the intended joint spacing and any edge margin. Check that the design finishes neatly on all sides.
Take a clear photograph of the layout. For a two-color pattern, sort spare tiles into separate containers so you can replace a piece without interrupting the arrangement.
Attach the tiles in manageable sections
Lift a small group of pieces, apply adhesive as directed, and return the tiles to position. Avoid spreading adhesive across more area than you can cover before it starts to set.
Keep the tile faces clean and leave the joints ready for the planned finish. Compare each new section with the surrounding rows. Correct alignment while the adhesive still allows adjustment.
Allow the adhesive to cure
Follow the timing for your specific adhesive, tile, and base. Do not rely on the surface feeling dry. Moving directly to grouting can disturb tiles or interfere with the fixing system.
For additional technique guidance, see Mosaic Art Supply’s grouting tutorial, which also emphasizes waiting for the glued mosaic to dry before grouting.
Grout and clean as directed
If your project calls for grout, choose a product suitable for the joint width and tile finish. Follow its mixing, protection, application, and cleaning instructions. Test first if you are concerned about staining or scratching decorative tiles.
Work grout into the joints, remove excess, and clean at the intervals specified by the manufacturer. Avoid washing out the joints with too much water. Keep grout residue out of household drains and follow local disposal guidance.
Finish and check the piece
Allow the full curing time before handling heavily or exposing the object to moisture. Inspect the edges and surface for loose pieces or sharp points. Add suitable backing pads or hanging hardware once the piece is ready.
Seal only if the selected materials require it. A sealer does not turn an indoor craft into an outdoor installation or make a surface safe for direct food contact or high heat.
Simple Moroccan inspired color combinations
Cobalt and ivory: A clear starting palette for coasters, frames, and geometric wall art. Use ivory for the larger area if you want the blue motif to stand out.
Green and cream: A gentle combination for stripes, plant-holder bands, and trinket trays. Repeat the same green rather than mixing several shades on your first piece.
Terracotta and white: A warm choice for zigzags and simple borders. Let the shapes create interest instead of adding more colors.
Turquoise, navy, and ivory: A useful three-color palette once you feel comfortable. Choose one color for the background, one for the main motif, and one for a small accent.
Grout changes the finished appearance too.
Test a sample if possible: a contrasting joint emphasizes every tile, while a closer color can let the larger pattern read more smoothly.
Common beginner mosaic mistakes to avoid
Starting too large
A small panel teaches the same basic habits as a large tabletop with fewer pieces to position. Save furniture and outdoor installations for a later project.
Choosing a pattern before checking the tile shapes
A star template only helps if your pieces can form it. Buy compatible shapes or choose a design that works with the tiles you already have.
Mixing uneven tile thicknesses
Variation can be useful in decorative art, but it makes coasters and trays harder to keep level. Use consistent pieces for functional surfaces.
Ignoring the border
The last row should look planned. Dry-fit the full width and height, including gaps, before you glue the first tile.
Using unsuitable materials
The base, adhesive, grout, and setting work together. A product intended for dry indoor craft use should not be assumed suitable for a damp plant holder.
Rushing the finish
Check curing times before starting and plan more than one session. Give your mosaic time to become ready for use rather than judging it only by appearance.
Frequently asked questions about beginner mosaics
What is the easiest mosaic project for a beginner?
A small checkerboard coaster or striped decorative panel is a good starting point. Both use equal-size square tiles and a repeating pattern, so there is little shape matching to solve. Choose a flat rigid base, use two colors, and arrange the complete design before gluing.
What supplies do I need to start making mosaics?
You need tiles, a suitable base, compatible adhesive, and a way to plan and position the pieces. Many projects also need grout, a sponge, and protective equipment specified by the products. Start with one complete project in mind so you can choose materials that work together.
Can I make a mosaic without cutting tiles?
Yes. Many easy mosaic ideas work entirely with pre-cut squares, rectangles, triangles, or compatible pattern sets. Adapt the base size to the tile layout instead of filling edges with cut slivers. Checkerboards, stripes, and simple borders are especially suitable for making mosaics without cutting.
What is the best base for a small mosaic?
The best base is rigid and compatible with your adhesive and intended use. A dry indoor plaque has different requirements from a coaster or an outdoor piece. Choose a prepared mosaic blank with clear guidance, or ask your supplier to match the base and fixing system to your project.
Do all mosaic projects need grout?
No. Some decorative mosaics are designed with exposed spaces between pieces. Whether you need grout depends on the method, materials, and intended finish. For a first project, follow a complete kit or product-supported method rather than omitting grout from a design that assumes it will be used.
What is the difference between mosaic art and Moroccan zellige?
Mosaic art is the broader practice of arranging small pieces into a surface or image. Traditional Moroccan zellige is a specific tilework craft using shaped glazed ceramic pieces and geometric compositions. A home project can borrow its patterns and colors without reproducing the traditional shaping and assembly techniques.
How long does a small mosaic project take?
A simple layout may fit into a short craft session, but the whole project includes adhesive curing and, where used, grouting and further curing. Tile count, pattern complexity, and product instructions determine the schedule. Plan separate sessions rather than expecting every mosaic to be ready for use immediately.
Can I put my beginner mosaic outside?
Only if the entire construction is suitable for outdoor exposure, including the base, adhesive, tiles, grout, and fixings. Rain, temperature changes, and frost can introduce conditions that an indoor craft system cannot handle. Make your first piece for indoors unless you are following a specifically supported outdoor method.
Fes Pottery Art
Choose one pattern and begin
The best mosaic ideas for beginners make the next step feel manageable. Choose a small base, settle on two colors, and dry-fit a checkerboard, stripe, or central diamond. You will learn more from finishing one simple piece than from planning an oversized design you never start.
As your confidence grows, try a border, a star, or a matching collection. And if your next trip brings you to Morocco, explore our zellige workshop in Fes to take that curiosity into an artisan-led experience.