
Pottery Painting Ideas: 25 Easy Moroccan-Inspired Designs
A blank plate can be surprisingly difficult to start. You have a brush, a few colors, and plenty of enthusiasm, but what should you actually paint? These pottery painting ideas give you a starting point, whether you want a simple dotted bowl, a blue floral plate, or a mug decorated with a tiny medina doorway.
Moroccan ceramics and architecture offer plenty of inspiration for a first project. Think of blue against a white background, repeating geometric shapes, curved doorways, and leafy borders. You can borrow one of these visual elements and build a design around it without attempting an elaborate pattern on your first try.
At Fes Pottery Art, we invite visitors to explore Moroccan decoration through hands-on painting. This guide brings together 25 accessible projects, with suggested surfaces, color palettes, and practical instructions. Some interpret traditional decorative elements; others take a more playful approach to Morocco’s streets and landscapes. They are creative starting points, rather than exact reproductions of historic designs.
Choose a pottery painting idea that suits your piece
The easiest pottery painting ideas for beginners use a small number of repeated marks: dots, short stripes, simple leaves, or broad blocks of color. Start with a flat tile or a plate if you want plenty of room to practice. A gently curved bowl also works well for a border around the outside.
For mug painting ideas, choose a design that fits on one side, such as an arch, an initial, or a sprig of leaves. A full pattern around the mug needs more planning because the handle interrupts your painting area. Vases suit taller motifs, including branches, palm leaves, and vertical stripes.
If you prefer a very simple first project, try the cobalt-blue dot border, two-tone dipped look, or single turquoise arch. For a little more detail, choose the flower medallion or medina door. Save the eight-point star for when you feel comfortable sketching a template and filling small spaces.
What you need before painting pottery
Choose the right surface and ceramic colors
Before you begin, establish whether your piece is unglazed bisque, already glazed ceramic, or another material. Bisque is clay that has undergone an initial firing. The surface and intended use determine which decorating products and finishing process are appropriate.
In a ceramics studio, use the underglazes or brush-on ceramic colors recommended for the studio’s clay and firing schedule. Ask whether your design needs a compatible clear glaze afterward. These details vary by product, so there is no single coat count, drying time, or firing temperature that suits every project.
For decorative projects at home, choose a paint explicitly suitable for your surface and follow its application and curing instructions. Ordinary acrylic paint does not become a fired ceramic glaze. A painted decorative plate should remain a display piece unless the complete finished system is confirmed suitable for food contact.
Food use requires more than a glossy finish or a “non-toxic” label. Ceramic manufacturer Mayco explains the difference between dinnerware-suitable products and decorative finishes, including the need for compatible materials and correct firing. Decide how you will use your piece before selecting your colors.
Keep your tools simple
You can create most of these easy pottery designs with a small round brush for details, a medium brush for filling shapes, and a soft sponge for preparation where your studio recommends it. Keep clean water, a palette, and a cloth nearby. A paper template and a studio-approved sketching tool help with stars, borders, and repeated shapes.
Prepare the surface as directed for your materials. Avoid handling the painting area unnecessarily, and practice a few marks on a suitable test piece before committing to your design. When working with ceramic colors that need firing, consult a fired sample to judge the final shade; the wet color can look different.
New to the studio experience? Our guide to your first pottery workshop explains how a beginner session works and what to expect.
Blue and white pottery painting ideas inspired by Fes
Blue and white is a useful palette for beginners because a single strong color can carry the whole design. Keep some of the background visible, and let the shape of the pottery guide the placement of your pattern.
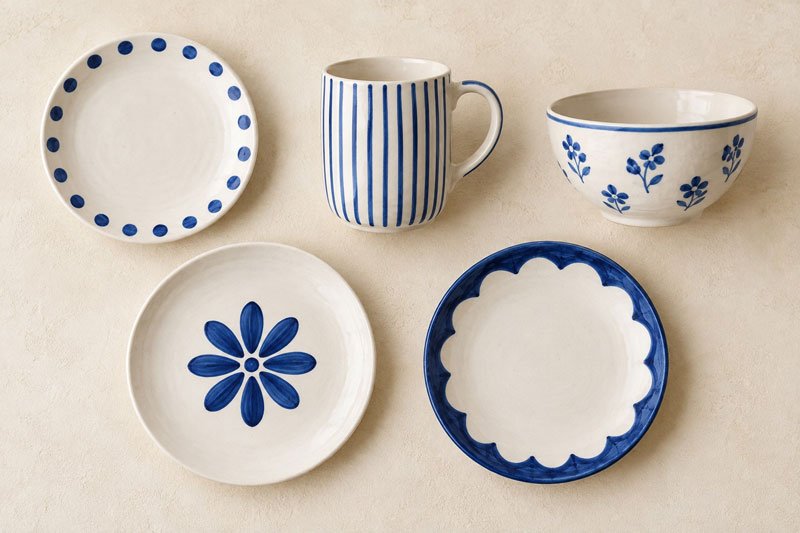
1 – Cobalt blue dot border
Best on a plate or shallow bowl, this very easy design needs only blue and a white background. Its appeal comes from a steady rhythm of marks rather than detailed drawing.
Lightly mark four evenly spaced reference points around the rim. Paint a dot at each point, then fill the gaps with dots of similar size. Once those are dry enough for your chosen product, add a second row just inside the first or leave the center completely plain.
Practice the pressure of your brush before starting. If the dots vary slightly, repeat that variation intentionally instead of trying to enlarge every dot to match the biggest one.
2 – Fine blue stripes
Straightforward stripes make useful ceramic painting ideas for small cups, mugs, and vases. Choose blue for the lines and keep the background light.
Sketch a few evenly spaced vertical guides on the outside of your piece. Paint one stripe at a time, rotating the pottery so your hand stays comfortable. Let the first set settle before adding narrower lines between them if you want more detail.
Short vertical strokes are easier to control than one continuous ring around a curved mug. Leave a little space beside the handle so the pattern has a deliberate stopping point.
3 – Small floral sprigs
Try this easy floral pattern on a plate edge or the outside of a bowl. A blue stem with a few leaves can suggest a flower without requiring realistic botanical drawing.
Paint a short curved stem, then add two or three leaves with light, tapered brushstrokes. Place a small cluster of dots at the top for the blossom. Repeat the sprig around the piece, turning alternate stems slightly toward one another.
Keep your sprigs the same approximate height and leave generous gaps. If the arrangement starts to look crowded, stop adding flowers and let the open background become part of the pattern.
4 – A central flower medallion
A central flower is one of the most adaptable plate painting ideas. It works particularly well on a round plate, where the circular shape helps organize the petals.
Mark the center and sketch a small circle. Add four petals at the top, bottom, left, and right, then fill the spaces between with four more. Paint the petals blue and leave narrow white gaps so the outline remains clear.
For a simpler version, use just four broad petals. Finish with a small dotted ring around the flower if there is enough space. Keep the outer rim plain so the medallion remains the focus.
5 – Scalloped blue borders
A scalloped border uses connected curves to frame a plate or bowl. Choose a medium blue brushstroke against white for a light design, or fill alternate scallops for a stronger effect.
Divide the rim into roughly equal sections with small guide marks. Connect neighboring marks with inward-facing curves, working around the piece. Check the overall spacing before adding a second line beneath the first.
Make the scallops comfortably large. Tiny curves magnify small differences and are harder to paint consistently. A few broad arches will look more confident on a first attempt.
Geometric pottery designs inspired by zellige
Zellige is assembled from shaped tile pieces. The projects below are painted interpretations of geometric tilework, so they do not require cutting or assembling tiles. Flat surfaces make it easier to plan the shapes and keep the spacing consistent.
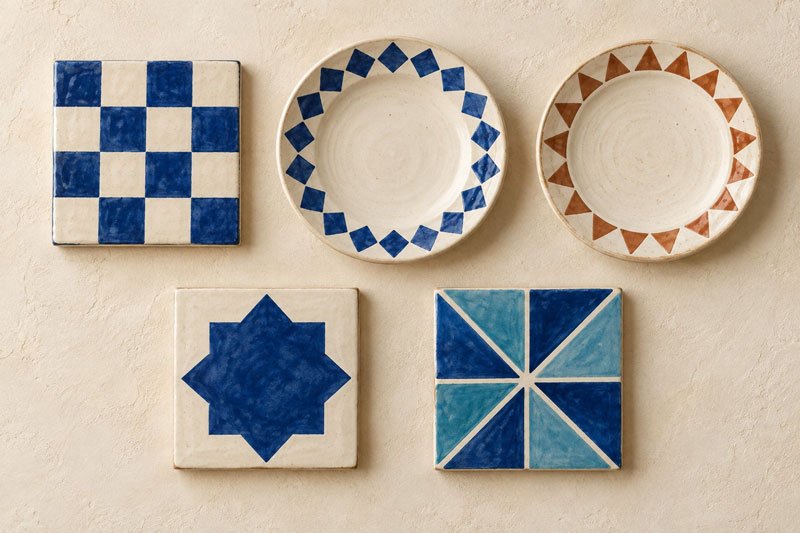
6 – Two color checkerboard
Use a flat tile or a small decorative plate for this easy grid. Blue and cream create a restrained design, while green and white give a fresher contrast.
Sketch a grid with large squares. Mark the squares you intend to color, then paint every other one, working outward from one corner. Keep a narrow unpainted margin around the perimeter to frame the pattern.
Count the squares across each row before painting. A small grid is easier to finish neatly than a large number of tiny checks, particularly on a plate where the edge starts to curve.
7 – Repeating diamond pattern
Diamonds suit a tile, a broad bowl border, or the side of a planter. Start with one color and add a second only if you want a stronger rhythm.
Draw a row of evenly spaced points along two parallel guides. Join alternating upper and lower points to build the diamond outlines. Fill alternate diamonds, leaving the others in the background color.
Keep the diamonds away from sharply curved edges while you are learning. If your outlines become uneven, widen the unpainted gaps slightly rather than adding more layers of thick detail.
8 – Triangle border
A triangle border is a good choice when you want geometric detail without covering the entire piece. Try terracotta triangles on cream, or alternate dark blue and turquoise.
Mark evenly spaced points around a plate rim. Add a second row of points slightly farther inward, positioned between the first row. Connect them to make triangles, then paint the shapes in a repeating sequence.
Plan the color order before you begin so it joins neatly where the border ends. On a mug, use a short strip of triangles on one side instead of a complete band.
9 – Eight point star
An eight-point star is the most detailed project in this group, but a template makes it approachable. Choose a flat tile or a broad plate and limit the palette to blue, turquoise, and white.
On paper, overlap two equal squares with one rotated 45 degrees. Trace the outer silhouette to create a simplified eight-point star template. Transfer that outline with a suitable marking method, then fill it carefully or paint only the border.
Leave plenty of space around the star. This basic motif introduces the geometry without attempting a complete interlocking zellige composition. Test the paper template on the piece before transferring it.
10 – Painted mosaic patchwork
This project suggests a mosaic through separate blocks of color. It is more forgiving than a precise repeating pattern and works well on a square tile or decorative dish.
Sketch a few large triangles, rectangles, and diamonds that fit together. Leave slim background-colored channels between them. Fill neighboring sections in different shades, using a limited palette such as cobalt, turquoise, and cream.
Avoid outlining every shape in a heavy dark line. The light channels already separate the colors, and keeping them visible helps the piece feel balanced. Start with six to eight shapes rather than dozens of fragments.
Mug and bowl painting ideas inspired by the medina
Doorways, rooflines, and everyday objects can become small illustrations on pottery. These designs work best when simplified into clear shapes, with one main feature on each visible side.
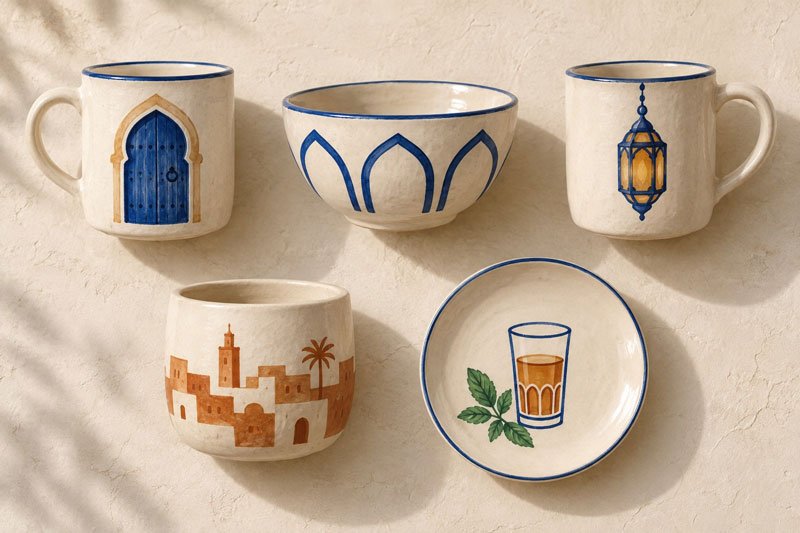
11 – A blue medina door
A little blue doorway gives a mug or small plate a recognizable focal point. Use blue for the door, a warm neutral for the frame, and a darker shade for minimal details.
Sketch a tall rectangle with a rounded or arched top. Paint the frame first, followed by the door panel. Once the surface is ready for another layer, add a central line and two small dots for handles.
Skip realistic wood grain on your first try. A clean silhouette and a contrasting frame are enough to make the doorway readable. Two tiny plant pots beside it can be an optional finishing touch.
12 – Moroccan arch outlines
Repeating arches can frame the outside of a bowl or wrap around a planter. A single row in blue or green keeps the design manageable.
Mark the base and height of each arch. Paint two short upright lines, then join them with a rounded or gently pointed top. Repeat with similar spacing, leaving the centers unpainted.
Use a paper guide to keep the height consistent. If several arches feel too ambitious, paint three across the front of your piece and leave the back plain. The limited arrangement can look just as complete.
13 – A simplified lantern
A lantern silhouette suits a mug, tile, or small vase. Amber and dark blue provide contrast, while a cream background leaves room for the outline to stand out.
Start with a small cap, a wider central body, and a short tapered base. Fill the body with your lighter color. Add a darker outline and a few diagonal strokes to suggest the lantern’s framework.
Keep the interior pattern sparse. Three or four lines will read more clearly than a dense network on a small mug. Add a short hanging loop at the top if space allows.
14 – Medina rooftop silhouettes
A rooftop design uses stacked rectangles, gentle steps, and occasional arches. It works well around the outside of a planter or across a decorative plate.
Draw an uneven skyline with buildings at several heights. Fill the shapes in terracotta and sandy cream, allowing neighboring buildings to differ slightly in tone. Add only a few windows or doorways after the main shapes are ready.
Leave the sky mostly empty. A small sun or a single cloud can finish the scene without competing with the rooftops. This is a loose travel-inspired illustration, so exact perspective is unnecessary.
15 – A mint tea motif
Paint a small tea-glass shape with mint leaves beside it for a personal reminder of a Moroccan visit. A mug or saucer provides enough space for this easy arrangement.
Outline a gently tapered glass, then add a narrow band of green near its base. Paint a curved mint stem beside it, using pairs of pointed leaves. A few blue dots beneath the scene can suggest a patterned tray.
Let the leaves carry most of the detail. The glass can remain a simple outline, which prevents the tiny illustration from becoming too crowded. Repeat one small leaf on the reverse of the mug to connect both sides.
Colorful pottery painting ideas inspired by Moroccan landscapes
Earthy colors and plant shapes offer an alternative to geometric decoration. These are contemporary illustrations inspired by scenery and everyday details, rather than claims about traditional Moroccan symbols.
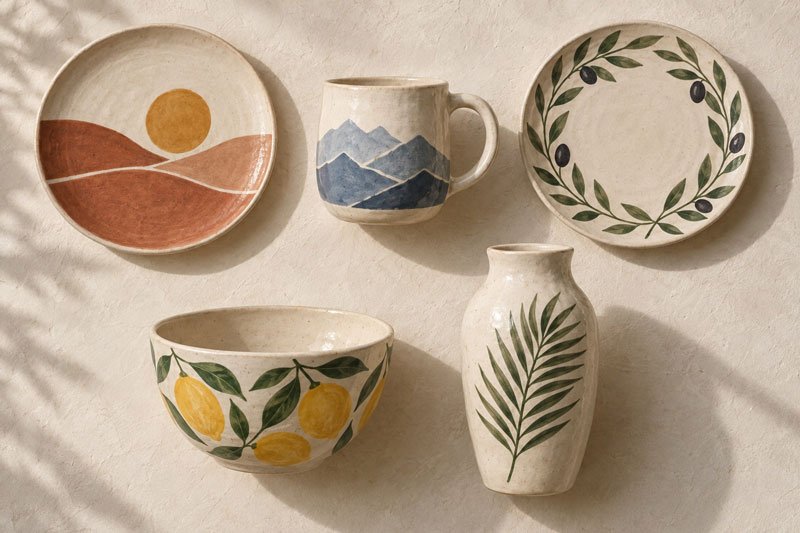
16 – Terracotta sunset
A sunset is an easy option for a decorative plate or tile. Choose terracotta, ochre, and cream, with one darker color if you want an extra layer.
Sketch a circle for the sun near the upper part of your design. Add two or three curved bands beneath it for hills. Paint each section separately, preserving a little space between the shapes if you prefer a graphic finish.
Keep the palette warm and the outlines simple. On a small piece, one sun and two bands are enough. Avoid adding tiny landscape details that distract from the large shapes.
17 – Atlas mountain shapes
Angular mountain forms suit a wide mug, tile, or planter. Use dusty blue, earthy brown, and an off-white background for a calm combination.
Draw a line of uneven peaks across the lower half of the surface. Add a second ridge behind it, then paint the distant ridge in the lighter shade. Give the foreground a stronger color to separate the layers.
Vary the peak heights so the pattern does not look like a row of identical teeth. Keep the upper half mostly clear, perhaps with a small sun. Broad planes of color are easier than detailed shading.
18 – Olive branches
Olive branches make delicate bowl painting ideas because the stems can follow a curve. Use muted green leaves and a darker green or brown stem.
Paint one curved line along the edge of your piece. Add narrow leaves on alternate sides, starting with light pressure and lifting the brush toward each tip. Place a few small dark ovals between the leaves if you want to suggest olives.
Work with one branch first. A second branch can balance the opposite side, but avoid filling every gap. On a mug, a single upright stem is often enough.
19 – Lemon and leaf pattern
Yellow lemons and green leaves create a cheerful pattern for a plate, planter, or decorative bowl. Keep the fruit large enough to paint comfortably.
Place three or five oval fruit shapes across the surface, adding a small point at each end. Fill them yellow, then paint one or two leaves beside each. Leave the remaining background plain or add a few widely spaced green dots.
Do not worry about realistic shadows. A clear yellow silhouette works well on its own. If you want variation, paint one lemon as a circle with simple segments to suggest a sliced fruit.
20 – Palm leaf design
A palm leaf gives a tall vase or planter a strong vertical shape. Dark green against cream is an easy combination to control.
Begin with a curved central stem. Pull short tapered strokes away from each side, starting near the base and gradually shortening them toward the tip. Turn the piece as you work so the brush moves in a comfortable direction.
Paint one generous leaf before deciding whether the piece needs more. For a flat plate, position the stem diagonally rather than directly through the center. A little asymmetry can make the composition feel less rigid.
Fes Pottery Art
Paint Your Moroccan Keepsake
Join a pottery painting workshop in Fes
Minimalist pottery painting ideas with Moroccan inspired colors
A restrained design is useful when you want to focus on brush control or finish a small project without intricate drawing. Choose one shape or color relationship and give it enough room.
21 – A two tone dipped look
This design creates the appearance of a partly dipped piece using a painted band. Try terracotta on cream, dark blue on white, or olive green on a pale background.
Mark a boundary around the lower outside of a planter or vase. Fill the area below it with a suitable medium brush, following the product’s coat instructions. Turn the piece carefully and inspect the boundary from several angles.
A slightly irregular edge can be intentional. If you want a sharp line, ask the studio about a compatible masking method rather than assuming ordinary tape will work on your surface. Follow its instructions for keeping kiln-contact areas clear.
22 – A single turquoise arch
One turquoise arch works particularly well on a cream mug or small tile. The open space around it gives the shape a clear outline.
Sketch a broad arch on the front of the piece. Paint the outer shape, then preserve a smaller arch-shaped area in the center so the motif reads as a thick band. Keep the sides similar in width.
Position it slightly above the midpoint on a mug, leaving space below. If your first outline looks uneven, adjust it while the design is still a sketch. Repeatedly repainting the edge can make it heavier than intended.
23 – A terracotta and cream border
Use short terracotta dashes or blocks around a cream plate for a quiet, warm design. This is one of the simplest alternatives to blue-and-white decoration.
Mark a few reference points around the rim. Paint evenly spaced short strokes between them, aiming for the same direction and approximate length. Leave the center empty or add a single small circle.
Decide whether the marks should point toward the center or follow the rim before starting. Consistent direction makes the pattern feel organized, even when individual brushstrokes vary slightly.
24 – A personalized initial medallion
An initial inside a simple frame makes a thoughtful painted gift. Choose a flat ornament, decorative dish, or mug, using one dark color against a pale base.
Sketch a circle, diamond, or soft arch for the frame. Add a clearly drawn initial in the middle, checking its spacing before painting. Finish with a few small dots or leaves around the frame.
Use a letter style you can reproduce comfortably rather than an elaborate script. If you want Arabic lettering, work from an accurate reference and ask someone fluent in the language to check the letter forms and connections before painting.
25 – A matching mini collection
Choose one motif from the guide and repeat it across a small set. A dotted mug, scalloped plate, and bowl with a simple blue border can feel connected without being identical.
Select two colors and decide which detail will appear on every piece. Paint the smallest item first so you can test the scale of the pattern. Adapt the same motif to larger surfaces by increasing its spacing or size.
Keep at least one element consistent, such as the dot size or the width of a border. If the pieces will be used as tableware, confirm that each finished item is suitable for its intended food or drink use.
How to make your painted pottery look more balanced
Limit the palette before adding detail
Two or three colors are usually enough for a beginner project. Pick a main shade, a supporting shade, and a background. If you add another color, give it a small role, such as the center of a flower or a few accent dots.
Fit the design to the shape
On a plate, choose between a central motif and a decorated rim before filling both. On a mug, check how the design looks with the handle facing left and right. Around a bowl, use reference marks to keep repeated shapes at a consistent height.
Paint large areas before fine lines
Establish the main shapes first, then add outlines, dots, or leaves when the product is ready for another layer. Rest your hand comfortably and rotate the piece instead of stretching across wet decoration. Keep a separate brush available for fine details if possible.
Make a small test before changing the whole piece
If you are unsure about a brushstroke or color combination, test it on a suitable spare surface. Ask the instructor how to correct a mistake with your particular decorating product. Scrubbing or adding a thick layer is not always the right solution.
Leave room for the background
Open space helps the viewer see the design. Stop occasionally and look at the whole piece from a little distance. A plate with one well-placed flower can feel more complete than a plate filled with several competing patterns.
Fes Pottery Art
Paint Your Moroccan Keepsake
Join a pottery painting workshop in Fes
Try pottery painting in Fes with local artisans
Painting a piece while visiting Fes gives you a chance to explore the patterns with an artisan nearby. You can ask how to simplify a border, hold a detail brush, or adapt a motif to the curve of your chosen pottery.
Our two-hour pottery designing and painting workshop in Fes introduces visitors to decorating a pre-made pottery piece with guidance from local artisans. Bring a favorite idea from this guide, or choose your design with help during the session.
Before booking, ask which pieces and finishes are available, whether your chosen project requires firing, and when it can be collected. If you are leaving Fes soon, mention your departure date so the team can explain the appropriate options. Dry paint and fully finished, food-suitable ceramic ware are not necessarily the same thing.
Prefer assembling shapes to painting them? Explore our zellige workshop in Fes for a different way to work with geometric patterns.
Book your pottery painting workshop in Fes and turn one of these ideas into a piece of your own.
Frequently asked questions about pottery painting
What are the easiest pottery painting ideas for beginners?
Dots, short stripes, broad color blocks, and simple leaves are good starting points. A dotted plate border requires very little drawing, while a two-tone planter lets you practice covering a larger area. Start with one motif and a limited palette before attempting small geometric details.
What paint should I use on pottery?
Choose the product according to the surface, firing process, and intended use. A ceramics studio can supply suitable ceramic colors for its bisque and kiln schedule. At home, use a product specifically intended for your surface. Do not assume ordinary craft paint is suitable for food-contact areas.
Can I paint pottery without a kiln?
You can decorate some ceramic surfaces with products designed for decorative use without kiln firing, following their instructions. Fired ceramic glazes require an appropriate kiln process. A household oven does not replace a ceramics kiln, and home curing does not automatically make a painted item food safe.
How do I paint a pattern on a curved mug?
Start with a small design on one side. Use light reference marks to establish its height and width, keep the mug supported, and rotate it as you paint. Leave space around the handle. Vertical stripes, a single arch, or one leafy sprig are easier than a dense wraparound illustration.
Which colors work well for Moroccan-inspired pottery?
Blue and white suit floral motifs and geometric borders. Turquoise, green, and cream work well for arches and painted mosaic designs. Terracotta and ochre suit landscape illustrations. Choose a small palette that supports your motif, and consult fired samples when the ceramic colors will change in the kiln.
Can I eat or drink from pottery I have painted?
Only when the complete finished piece is suitable for that use. The decorating materials, glaze, firing, and finished surface all matter. The FDA advises against using pottery labeled for decoration for cooking, serving, or storing food or drinks. Ask the maker or studio about your specific piece.
Do I need drawing skills for a pottery painting workshop?
No advanced drawing skills are needed to begin with dots, stripes, leaves, or simple shapes. Templates can help with more detailed patterns. Choose a manageable design and ask the instructor to demonstrate a brushstroke before repeating it across your piece.
Can I take my painted pottery home on the same day?
That depends on the surface, decorating products, and finishing process. Some decorative projects may be ready sooner than work requiring glaze firing. Confirm collection arrangements before the session, particularly if you are traveling the next day. Do not pack a piece until the studio confirms it is ready.